Live2D Guide
To add a new Live2D model to your project, you need to complete three to five steps:
- Get a Live2D model (optional)
- Configure expressions and motions for your Live2D model (optional)
- Place the Live2D model files in the
live2d-modelsfolder - Configure model information in the
model_dict.jsonfile - Specify the Live2D model to use in the character configuration file (
conf.yamlor character setting files in thecharactersdirectory)
1. Get a Live2D Model
Currently, the project uses pixi-live2d-display-lipsyncpatch which only supports Cubism2/3/4 models and does not support the latest Cubism5.
If you already have a suitable Live2D model, you can skip this step. Here are some common sources for obtaining Live2D models (feel free to add more sources):
2. Configure Live2D Model
The Live2D model configuration file is an important file containing multiple settings such as expressions and motions. Since the configuration methods are diverse and complex, this part of the tutorial is not yet formally started. You can choose to:
- Learn configuration methods by searching online resources
- Skip this part for now and come back when you have a deeper understanding of Live2D model configuration
- If you have relevant experience, you're very welcome to help us improve this content through PR or Issue
Since most Live2D models are extracted from games or primarily used for streaming, their expressions and motions may not be entirely suitable for this project's use case. For the best user experience, it's recommended to first check the model's configuration file (model.json or model3.json) and make appropriate adjustments as needed to achieve better interaction.
You can use the following tools to view and adjust models:
- Vtuber Studio
- Live2DViewerEx Studio
- Live2D Cubism Viewer
You can:
- View and test the model's expression list
- Preview all available motion effects
- Add Idle motion groups
- Create custom motion groups
- Add new expressions
- Create new motions
3. Place Model Files
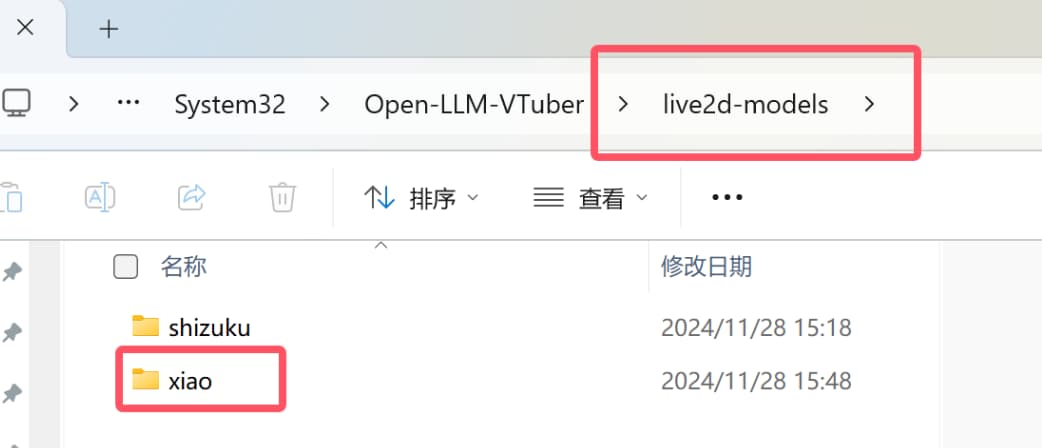
Put your Live2D model files in the live2d-models folder, as shown in the image with the xiao folder.

4. Add Model Configuration
In the model configuration, only name (model identifier), url (model path), and kScale (scaling ratio) are required fields. Other configuration items such as emotionMap (expression mapping) and tapMotions (touch actions) are optional - not filling in these configuration items will cause the model to lose expression changes and motion interaction functionality.
Add the model configuration in the model_dict.json file in the project root directory. Here's a complete configuration example:
{
    "name": "shizuku-local",
    "description": "Orange-Haired Girl, locally available. no internet required.",
    "url": "/live2d-models/shizuku/shizuku.model.json",
    "kScale": 0.5,
    "initialXshift": 0,
    "initialYshift": 0,
    "idleMotionGroupName": "idle",
    "emotionMap": {
        "neutral": 0,
        "anger": 2,
        "disgust": 2,
        "fear": 1,
        "joy": 3,
        "smirk": 3,
        "sadness": 1,
        "surprise": 3
    },
    "tapMotions": {
        "body": {
            "tap_body": 30,
            "shake": 30,
            "pinch_in": 20,
            "pinch_out": 20
        },
        "head": {
            "flick_head": 40,
            "shake": 20,
            "pinch_in": 20,
            "pinch_out": 20
        }
    }
}
4.1 Basic Configuration
| Config Item | Description | Example Value |
|---|---|---|
name | Unique identifier for the model, preferably in English | "shizuku-local" |
description | Model description (optional) | "Orange-Haired Girl" |
url | Model file path | "/live2d-models/shizuku/shizuku.model.json" |
-
Supports both local paths and remote URLs
-
Local paths should start with
/live2d-models/, not./live2d-models/ -
Remote URLs should point to valid
.model.jsonor.model3.jsonfiles, e.g.,https://cdn.jsdelivr.net/gh/guansss/pixi-live2d-display/test/assets/shizuku/shizuku.model.json -
When loading HTTPS resources while accessing the Web via HTTP protocol, you may encounter the error
Failed to load LiveD model: Error: Network error. In this case, you need to allow the website to load insecure content in your browser settings:- Chrome: Click the shield icon on the right side of the address bar -> Site Settings -> Insecure content -> Allow
- Firefox: Click the lock icon on the left side of the address bar -> Turn off Enhanced Tracking Protection
- Edge: Click the lock icon on the right side of the address bar -> Site permissions -> Insecure content -> Allow
4.2 Display Configuration
| Config Item | Description | Recommended Value |
|---|---|---|
kScale | Initial model scale | 0.3 ~ 0.5 |
initialXshift | Initial horizontal position offset | 0 |
initialYshift | Initial vertical position offset | 0 |
- When both
initialXshiftandinitialYshiftare set to0, the Live2D model is usually centered in the canvas. For some special models, you may need to manually adjust these two parameters to achieve the desired display position. - About model size:
- The
kScaleparameter only determines the initial size of a model when it's first loaded in the browser/device. It doesn't determine the size for subsequent uses of the model. - In the frontend interface, you can adjust the model size using the mouse wheel or pinch-to-zoom on touchscreens.
- After manually adjusting the model size, the system will remember the size for that model in the current browser/device and current mode using
localStorage. - The next time you use it on the same browser/device (without clearing localStorage), the previously set size will be automatically applied.
- The
Note that when the container size changes (e.g., resizing the window, collapsing/expanding sidebars or bottom bars, switching display modes, etc.), the Live2D model will reset to its initial position but maintain its current scale.
4.3 Idle Motion Configuration
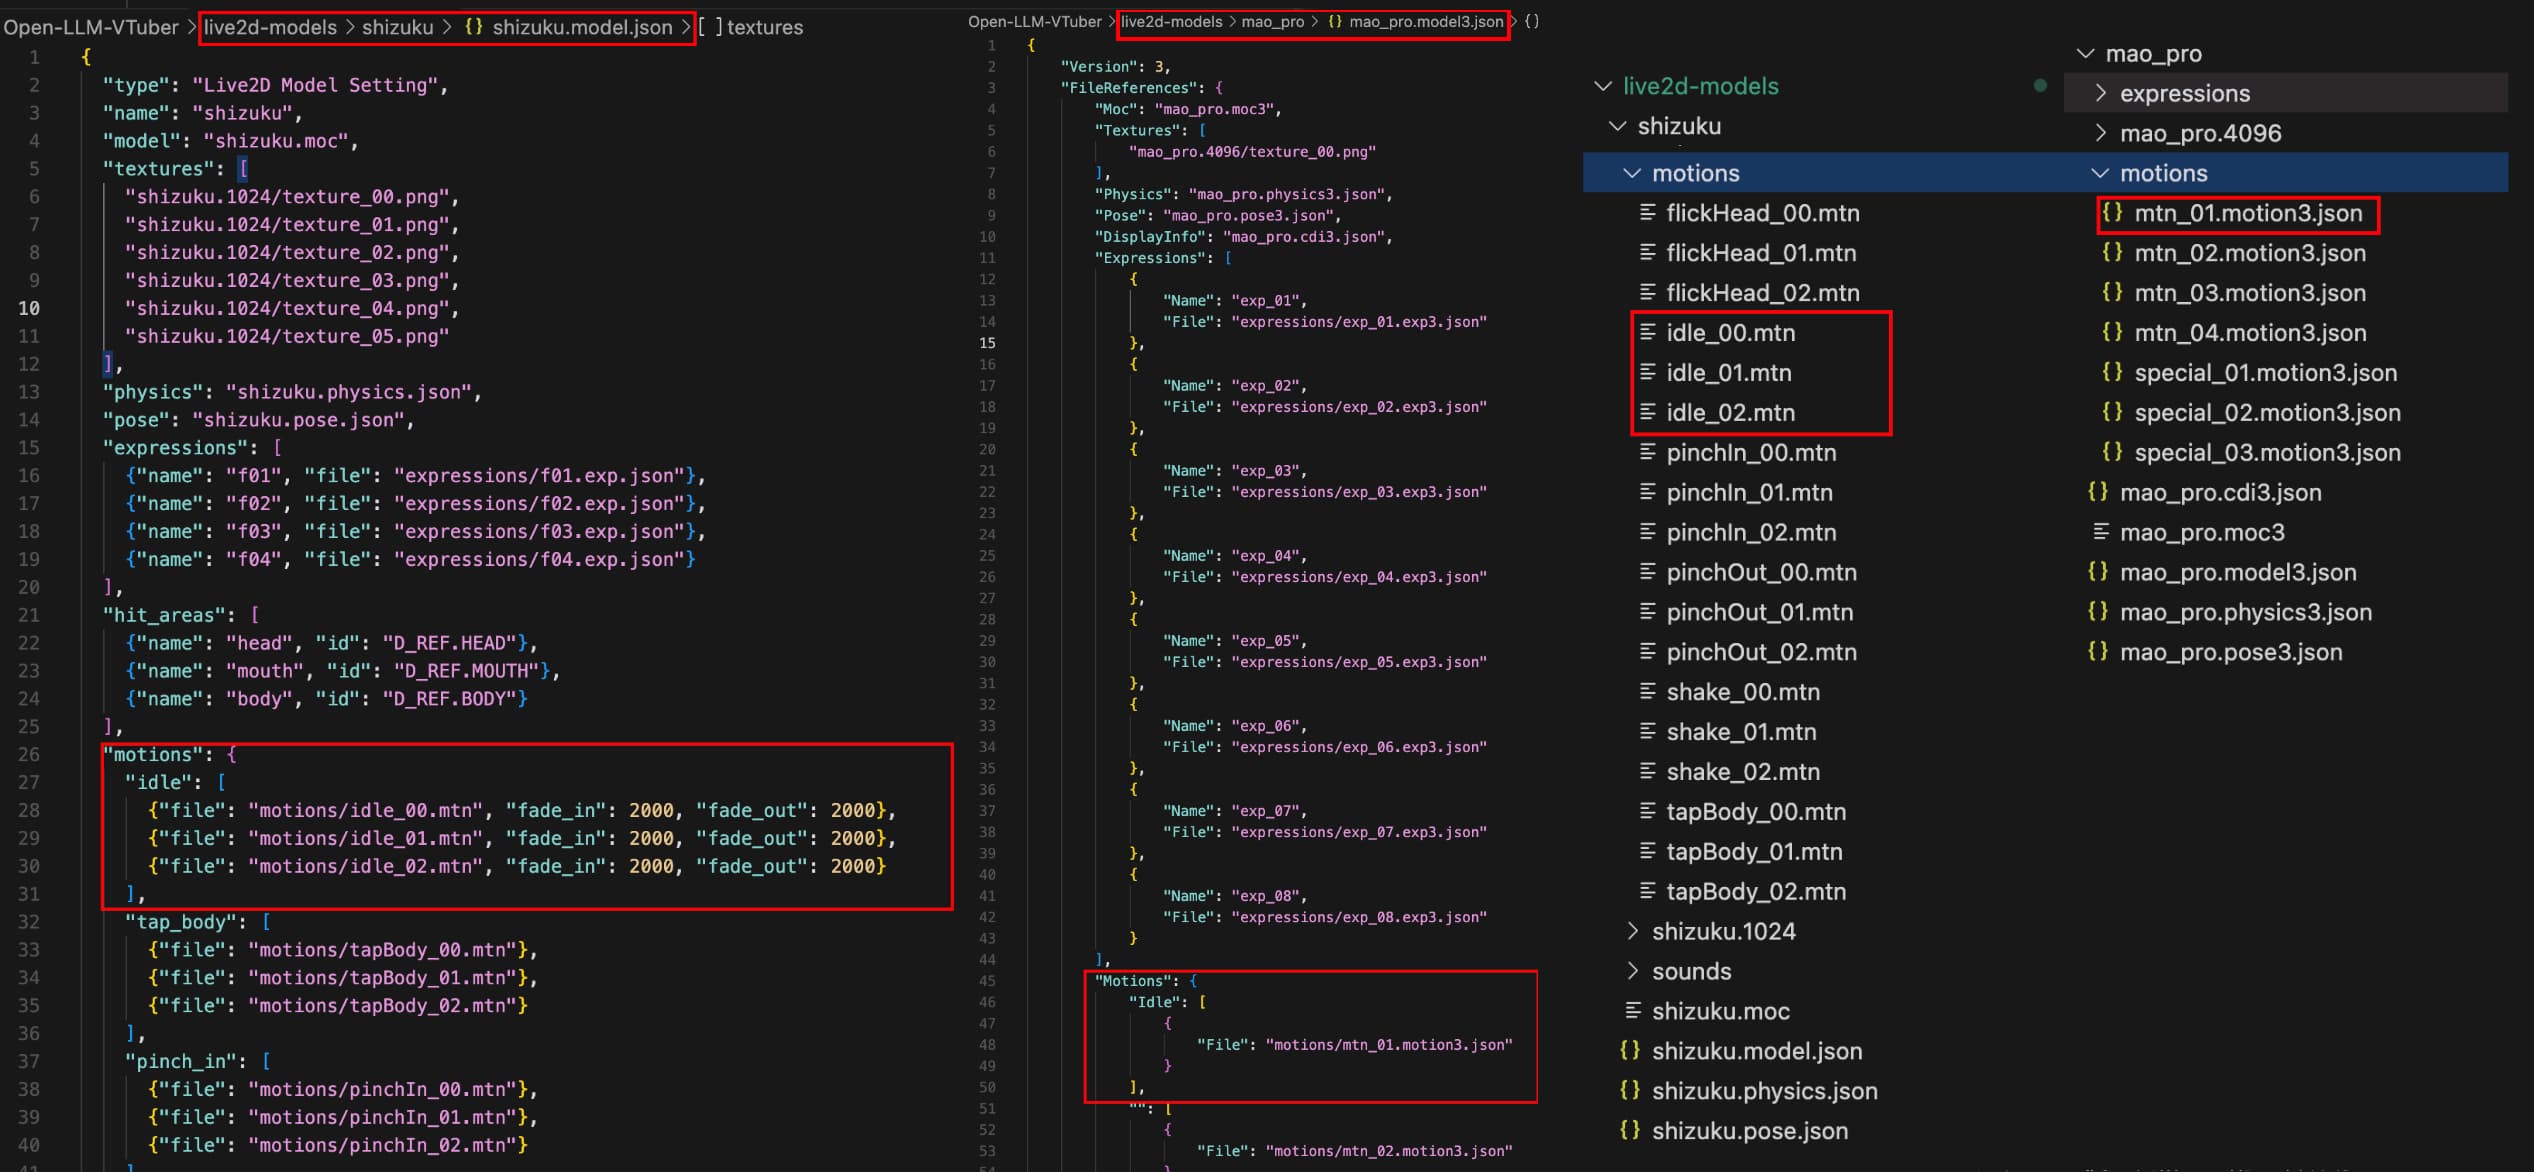
Live2D model motion animations are generally divided into multiple motion groups. Each motion group contains a series of related motion animations. In the model.json file, these motion groups are usually defined under the motions or Motions field.
Idle motions are the basic animations that the model plays randomly when there's no interaction. They are usually placed in a motion group named idle or Idle, and the system will randomly select a motion from this group to play.
The specific motion group name needs to be based on the name in the model configuration file model.json or model3.json, as shown in the image.

If you understand the model's motion structure, you can also configure your own idle motion group. However, unless you know what you're doing, it's recommended to keep the default value of idleMotionGroupName (idle or Idle).
4.4 Expression Configuration
emotionMap defines the expression mapping available to the AI, while defaultEmotion sets the model's default expression.
Default Expression Configuration
defaultEmotion is an optional configuration item that specifies which expression the model should display after loading or when a dialogue ends. Its value can be either an expression index (number) or expression name (string), and needs to use the same mapping method as emotionMap.
Some models may come with watermarks. In this case, you can create an expression without the watermark and set it as the default expression to remove the watermark.
Expression Mapping Configuration
emotionMap supports two mapping methods:
- Using expression indices (numbers)
- Using expression names (strings)
Configuration Example
- First, check the expression definitions in the model file:
// model.json
"expressions": [
    {"name": "f01", "file": "expressions/f01.exp.json"}, // index 0
    {"name": "f02", "file": "expressions/f02.exp.json"}, // index 1
    {"name": "f03", "file": "expressions/f03.exp.json"}, // index 2
    {"name": "f04", "file": "expressions/f04.exp.json"}  // index 3
]

// Or you might encounter in model3.json file
"Expressions" : [
    {"Name": "f01", "File": "f01.exp3.json"}, // index 0
    {"Name": "f02", "File": "f02.exp3.json"}, // index 1
    {"Name": "f03", "File": "f03.exp3.json"}, // index 2
    {"Name": "f04", "File": "f04.exp3.json"} // index 3
]
- Then configure the expression mapping in
model_dict.json. You can choose one of the following two methods:
Method 1: Using expression indices (note to use numbers instead of strings as indices)
"emotionMap": {
    "neutral": 0,  // corresponds to f01 expression
    "anger": 2,    // corresponds to f03 expression
    "disgust": 2,  // also uses f03 expression
    "fear": 1,     // corresponds to f02 expression
    "joy": 3,      // corresponds to f04 expression
    "smirk": 3,    // also uses f04 expression
    "sadness": 1,  // also uses f02 expression
    "surprise": 3  // also uses f04 expression
}
Method 2: Using expression names
"emotionMap": {
    "neutral": "f01",
    "anger": "f03",
    "disgust": "f03",
    "fear": "f02",
    "joy": "f04",
    "smirk": "f04",
    "sadness": "f02",
    "surprise": "f04"
}
Configuration Notes
- If using index mapping, index values start from 0 and follow the order of the
expressionsarray in the model file - If using expression name mapping, ensure the names match exactly with those defined in the model file
- Multiple emotions can be mapped to the same expression index or name
The AI will use the [emotion] format in dialogues to trigger expression changes, for example:
Oh, damn it! [anger] What you just said is even harder to swallow than Uncle Johnson's egg and tofu noodles.
When the system recognizes [anger], it will make the Live2D model in the frontend display the expression corresponding to the anger keyword (index 2 in the above example).
The expression will persist until:
- The next expression keyword is encountered
- Or automatically reverts to the default expression after the dialogue ends
- Use simple, clear English words as keywords
- Ensure the keywords are easy for the AI to understand and use accurately
- Avoid using overly long or complex names
- Choose appropriate emotion mappings based on the model's expression characteristics
4.5 Interaction Motion Configuration
tapMotions defines the motion mapping for model interactions with the mouse. When a user clicks on the model, the system will randomly trigger a corresponding motion based on the clicked area and the configured weights.
Configuration Example
"tapMotions": {
    "body": {  // Body area
        "tap_body": 30,   // Motion name: weight
        "shake": 30,
        "pinch_in": 20,
        "pinch_out": 20
    },
    "head": {  // Head area
        "flick_head": 40,
        "shake": 20,
        "pinch_in": 20,
        "pinch_out": 20
    }
}
Configuration Notes
- Click area names
- Live2D 2.0 models: Usually use area names like
body,head, etc.
"hit_areas": [
    {"name": "head", "id": "D_REF.HEAD"},
    {"name": "body", "id": "D_REF.BODY"}
]- Live2D 3.0/4.0 models: Usually use area names like
HitAreaBody,HitAreaHead, etc.
"HitAreas": [
    {"Id": "HitAreaHead", "Name": ""},
    {"Id": "HitAreaBody", "Name": ""}
] - Live2D 2.0 models: Usually use area names like
- Motion names
- Must exactly match the motion group names defined in the model configuration file
- Weight settings
- Range: Recommended to use integers from 0-100
- Higher weight means higher probability of the motion being triggered
- The sum of all motion weights within the same area doesn't need to equal 100
Trigger Logic
-
When a user clicks on the model in the frontend (can be set to enable or disable), the system will:
- First detect the clicked area (hitTest)
- Randomly trigger a motion based on the configured motions and weights for that area
- If no hit area is detected, it will merge all area motions and randomly trigger one based on weights
-
Weight calculation example:
"head": {
    "flick_head": 40,  // 40% probability
    "shake": 20,       // 20% probability
    "pinch_in": 20,    // 20% probability
    "pinch_out": 20    // 20% probability
}
5. Modify Character Configuration
Specify the Live2D model to use in the character configuration file. You can:
- Configure in the main configuration file
conf.yaml(frontend default configuration) - Create a new character setting file in the
charactersdirectory for the character you want to configure (can be switched in the frontend)
The configuration method is very simple. Taking conf.yaml as an example, you only need to find the live2d_model_name field under the character-config configuration item and set its value to the name of the Live2D model you want to use. Please note that this name needs to be consistent with the name field of the corresponding model in the model_dict.json file.

Explanation of other configuration fields in the image:
conf_name: This name will be displayed in the character selection in the frontend interface. You can think of it as the configuration name / character name, and you can name it as you like.conf_uid: This is the unique identifier for the character configuration. Please ensure its value is unique.